As someone deeply immersed in homebrewing, I’ve come to realize that certain pieces of equipment can dramatically elevate the brewing process. Cooling down hot wort has always been one of those critical steps where both speed and precision matter. After years of relying on standard immersion chillers, I decided to explore other options and discovered a system that truly changed the game. This exchilerator maxx counterflow wort chiller review is a thorough dive into my hands-on experience using this unique piece of equipment and how it has reshaped the way I brew.
The Need for a More Efficient Wort Chiller
When I first started brewing, I used basic tools—a typical immersion chiller submerged in a kettle of steaming wort, hoping the process wouldn’t take all day. While that worked initially for small batches, it quickly became clear that it couldn’t keep up with my growing ambitions. I wanted to brew more often, experiment with bigger batches, and reduce the overall cooling time to avoid contamination and improve clarity.
I began looking for an efficient system that would cool wort faster and more consistently. After comparing many models and watching countless videos, I stumbled upon the Exchilerator Maxx. It stood out not just for its performance but also for its robust design and positive feedback across the brewing community. That’s when I decided to give it a go.
Out of the Box and First Impressions
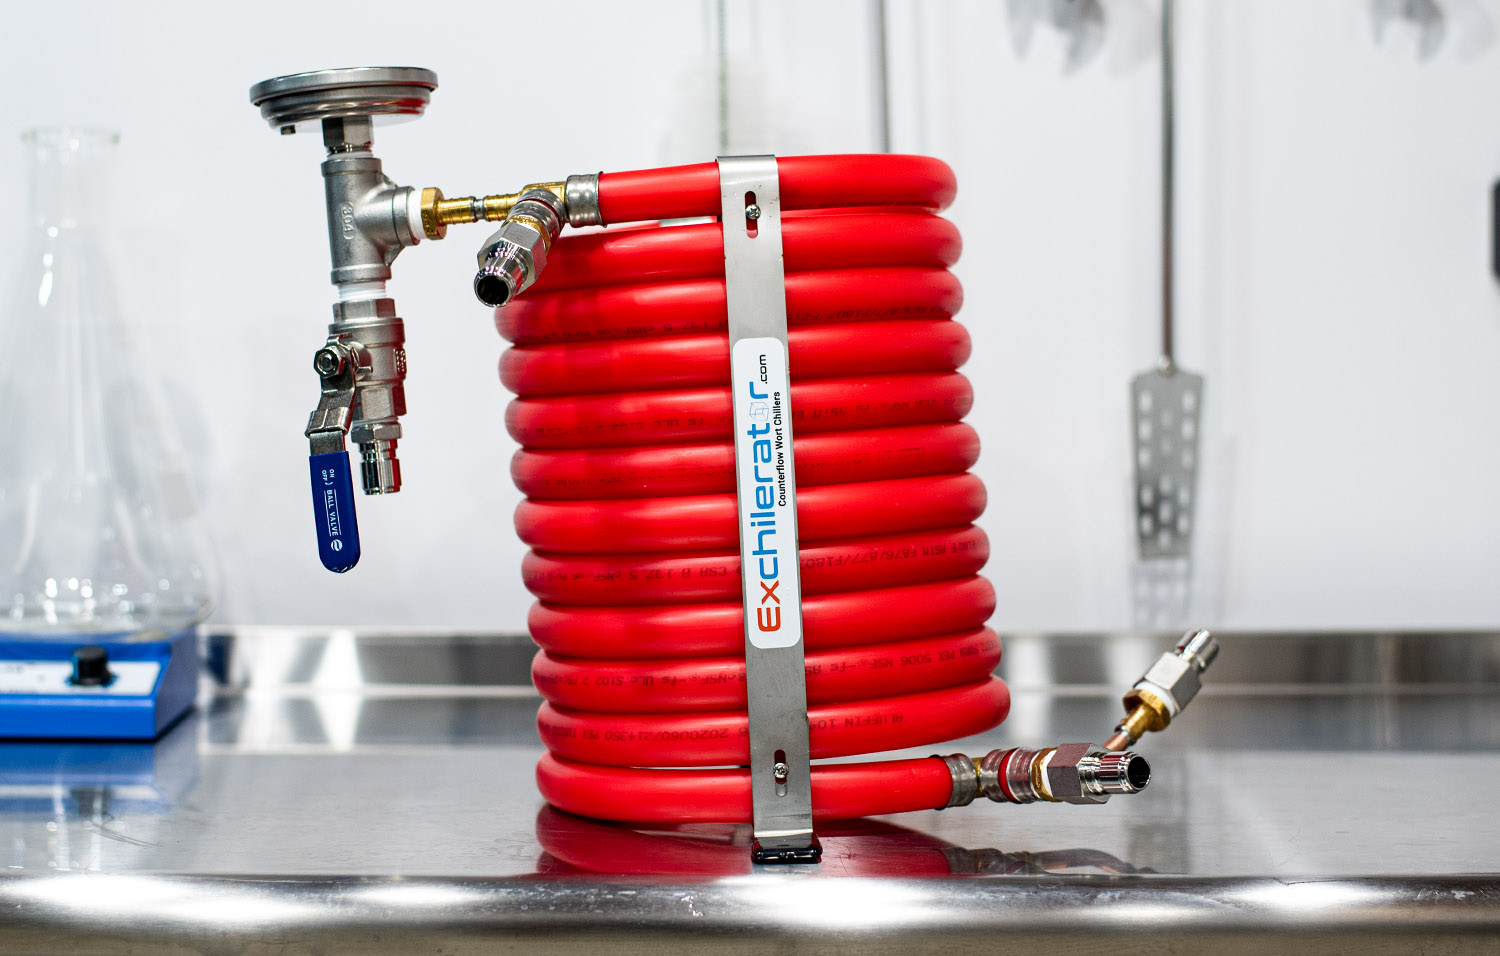
When I unboxed the Exchilerator Maxx, the quality was immediately noticeable. The entire setup had a professional-grade appearance, and everything felt sturdy. The copper tubing inside the PEX shell looked durable and thoughtfully assembled. The fittings were heavy-duty brass, compatible with the gear I already owned, and nothing felt cheaply made.
Installation was surprisingly simple. I connected the chiller to my brew kettle with standard hoses and used a garden hose for the cooling water. With a few quick turns of the wrench, I had everything secure. The instructions that came with it were clear, and I appreciated not needing to purchase extra adapters or parts to get started.
Putting It to the Test: First Brew Day
For its maiden run, I decided to brew a 6.5-gallon batch of a West Coast IPA. The moment of truth came after the boil when I connected the hot wort to the Exchilerator Maxx and turned on the water flow. To my amazement, the wort coming out the other end was almost immediately down to yeast-pitching temperature.
In under 10 minutes, I had my wort cooled from a roaring boil to a fermentation-safe temperature. This was a huge improvement over my immersion chiller, which often took more than 25 minutes and used a tremendous amount of water. The wort temperature exiting the chiller hovered just a few degrees above the input water, which was ideal for pitching yeast directly into the fermenter.
Fine-Tuning Temperature and Flow
One of the key highlights I want to mention in this exchilerator maxx counterflow wort chiller review is the control it gave me over temperature. With simple flow adjustments, I could control both the wort and the cooling water’s speed. This flexibility made it possible to hit target temperatures consistently, whether I was brewing a lager that needed cooler fermentation or an ale that could handle slightly warmer wort.
For years, I had worked around the limitations of my gear. Now, I felt like I was finally in charge of the process instead of adapting to the inefficiencies. It gave me a greater sense of professionalism in my home setup and encouraged me to start brewing more often.
Water Conservation Benefits
Living in an area where water conservation is encouraged, I was always uncomfortable with how much water my old setup wasted. One of the reasons I chose the Exchilerator Maxx was its reputation for being water-efficient. After using it for several brew sessions, I can confirm that it delivers on that promise.
Because of its efficient design and superior heat exchange, I found I could reduce the cooling water flow rate without compromising on performance. Even better, I collect the outflow water in large containers to clean equipment or water the garden. This made my brew days feel less wasteful and more sustainable.
How Easy Is It to Clean?
After each session, cleaning is often the last thing I want to do. Fortunately, the Exchilerator Maxx makes this part of the process almost effortless. I simply flush it with hot water immediately after use, then push through a sanitizing solution before storing it for the next brew.
The internal design prevents the buildup of hop residue or trub, especially if you use a hop spider or kettle filter. I haven’t had to deal with clogs or backflow issues, which were sometimes a concern with other chillers. For deep cleans, I occasionally recirculate PBW through the chiller for 15–20 minutes, just to be thorough.
Scaling Up: Performance on Larger Batches
My brewing has evolved from 5-gallon batches to brewing up to 10 gallons at a time. I was a little nervous at first that the Exchilerator Maxx might not keep up with the volume increase. However, I was pleasantly surprised—it handled the larger volume without skipping a beat.
Even with back-to-back brews on the same day, the chiller performed consistently. The heat exchange efficiency never dropped, and cooling times remained fast. This is particularly important if you’re considering scaling up your home setup or even transitioning into small-batch commercial brewing.
Real World Observations and Minor Drawbacks
No equipment is perfect, and in the interest of honesty in this exchilerator maxx counterflow wort chiller review, I should note a couple of things. First, while setup is fairly intuitive, adding quick-connect fittings would improve ease of use. I added them myself later, and it made a noticeable difference in setup time.
Also, the price might be a hurdle for new brewers. Compared to immersion chillers, it’s a bigger upfront investment. But when you factor in long-term savings in time and water, along with better cooling performance, I believe it’s worth the cost.
Brewing More Confidently
Perhaps the biggest impact this chiller had on me wasn’t technical—it was psychological. Brewing used to feel like a series of compromises. I’d accept slower chilling, less control over temperature, and more water waste simply because I didn’t know there was a better option. Using the Exchilerator Maxx gave me confidence and made brewing feel more seamless and professional.
Knowing I could cool wort quickly and accurately allowed me to experiment more with styles, ingredients, and even spontaneous brewing sessions. That confidence spilled over into other areas of my process—from better fermentation results to cleaner, more refined beers.
Who Should Buy It?
If you’re just starting out and brewing one-gallon stove-top batches, this may be overkill. But if you’re brewing 5 gallons or more and want consistent results, faster chilling, and greater control, this piece of gear is absolutely worth considering.
It’s especially useful for brewers who are serious about sanitation and want to pitch yeast at exact temperatures to reduce stress and improve fermentation profiles. For anyone planning to brew frequently or at higher volumes, this chiller is a fantastic investment.
Final Thoughts
Wrapping up this exchilerator maxx counterflow wort chiller review, I can say with complete honesty that this piece of equipment transformed my brew days. From faster chill times to better temperature control and less water waste, the benefits have been tangible in every batch I’ve brewed since making the switch.
The Exchilerator Maxx delivers on its promises. It’s built to last, performs with precision, and makes brewing more efficient and enjoyable. If you’ve been struggling with slow wort cooling or are looking to upgrade your brewing game, this chiller is one of the smartest investments you can make. I wish I’d made the switch sooner.